Microsoft Office PowerPoint 2010 allows its user the
freedom to use audio-visual content in his presentation easily. It supports a
large variety of Video Files such as Video Files, Windows Media File, MP4
Video, MPEG-2 TS Video and Window Media Video File, along with Audio Files such
as ADTS Audio, AIFF audio file(aiff), AU audio file(au), MP3 and MP4 audio
files.
The Audio and Video Content can be added
in Microsoft Office PowerPoint 2010 using the Media Clips Option Under the Insert
Tab.
Adding
Audio Files in Microsoft Office PowerPoint 2010:
- To
open the dropdown menu, click on the Audio
icon.Screenshot of the dropdown menu of the Audio option.

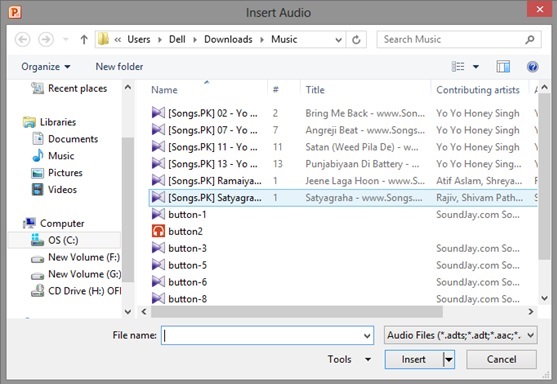
- Choose any of the three option to add Audio from various sources, like from a previously saved File on your Computer, from Clip Organizer or to record Audio. Let us choose, Audio From File.
- On clicking
Audio from File, the set of folders
containing the files present on your system will get displayed. The desired Audio
file inside the selected folder can be opened by placing the cursor and
clicking on it.
Screenshot
of the files present in the Music Folder
after clicking on Audio from File is
as shown:

- Choose the desired File and Click on OK.
- Clicking on OK¸ adds the audio file to the slide.
- To
open the dropdown menu, click on the Video
icon.
Screenshot of the dropdown menu of the Video option:
- Choose any of the three option to add Video to your presentation, like to add Video from a previously saved Files, click on Video from File or to add from a Web Site, click on Video from Web Site or to add from Clip Organizer, click on Video from Clip Organizer. Let us click on Video from File.
- On clicking Video from File, the set of folders containing the files present on your system will get displayed. The desired Video file inside the selected folder can be opened by placing the cursor and clicking on it. Screenshot of the files present in the Video Folder after clicking on Video from File is as shown:

- Choose the Desired file and Click on Ok.
- Clicking on OK, adds the Video File to the slide.
Thanks for viewing this post, go to our archives section to see the list of other posts.Blog Archive - http://solution2everything.blogspot.in/p/blog-page.html


:) :) :) :) :)
ReplyDeleteThanks for this post.
Lost Love Back Solution – Astrologervinodkumar.com
Best Vashikaran Specialist
black magic specialist
Love Marriage Problem Solution – Loveguruindia.com
Love Marriage Specialist – Loveguruindia.com
vashikaran mantra for love
Vashikaran Mantra in Hindi – Loveguruindia.com
vashikaran love spell-Loveguruindia.com
Vashikaran Specialist Baba – Loveguruindia.com
Vashikaran Totke – Loveguruindia.com
world famous astrologer
love marriage spell – loveguruindia.com
Black magic to get love back – Loveguruindia.com
black magic specialist
Love spell
Vashikaran specialist in Bangalore
black magic removal
career problem solution – Astrologerhome.com
money gain mantra
relationship problem solution– Astrologerhome.com
vashikaran expert
horary astrology
hindu astrology– Astrologerhome.com
love vashikaran mantra